How to Pipette Like A Pro
Pipetting is an important part of canine hormone testing. If the wrong volume is used, the wrong result will be produced.
Although it seems simple, there is actually a fair amount to pipetting correctly.
In this guide, we will go over all the dos and don'ts and by the end, you'll be able to pipette like a pro.
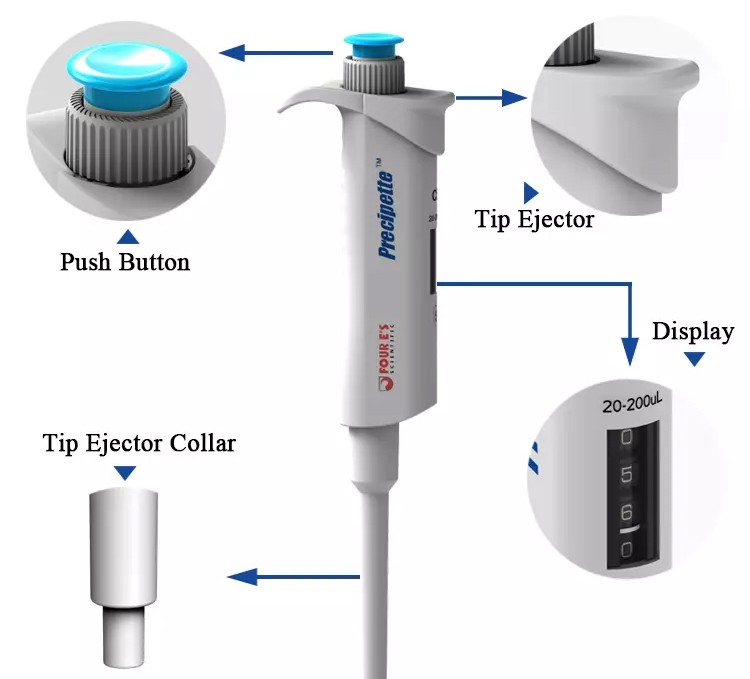
1st, lets go through the parts on a standard pipette, featured to the left.
The push button (blue), is your primary control on the pipette. It used to both draw up and dispel sample. It has 2 positions, the 1st stop and the 2nd stop, these will become very important later on.
The push button is also used to set the volume of the pipette (if its adjustable). Twisting the blue push button will adjust the volume both up and down within the confines of the size pipette. As you twist, the volume will change on the display.
The tip ejector is used to eject a used tip, after it has been used. Remember, always use a new tip for every pipetting action.
Drawing Up Sample
Now that you know the parts on the pipette, let's put those parts to use. The 1st step is always drawing up.
As mentioned before, every pipette has 2 stops. The 1st stop can be found by gently pushing the plunger down, at the point where resistance increases and you would have to push harder to push it farther, that sticking point is the 1st stop. The 2nd stop is all the way tp the bottom, use brute force and push hard (in pipetting terms) and you will find the 2nd stop. The 2nd stop is the end of the range of motion.
The 1st stop is always used for pulling up liquid.
The 2nd is always used for dispelling liquid.
Step 1. Verify your pipette is set to the correct volume.
Step 2. Place a new pipette tip on.
Step 3. Push down to the 1st stop and hold.
Step 4. While still holding the 1st stop position, place the tip into the middle of the liquid and release the push button.
You now have the correct amount of solution in your pipette tip.
New! Anbio 100C! Accurate, Easy To Use, Progesterone That Reads Like Your Vet! Check It Out! 2 Year Replacement Warranty!
Test Progesterone, In 10 Minuites With Only 50 ul Of Sample!

Anbio 100C Canine Progesterone Machine - Premier Bundle

Anbio 100C Canine Progesterone Machine - Analyzer Only

Anbio 100C Canine Progesterone Machine - Startup Bundle

Healvet 3000 Progesterone Kit (10 ct)

Healvet 3000 Pregnancy Test For Dogs (10ct)

Anbio 100C Progesterone Test Kit (10ct)


540 Shady Lane, Neenah Wisconsin. Home for CanineP4.com! Here's Where It All Happens!
844-673-7378 Call For Appointment.
All major credit cards accepted including Paypal.
Breeders Tech Center In Neenah Wisconsin. Home for CanineP4! It's Where It All Happens!
844-673-7378 Call For Appointment.
For all general inquiries, please contact us at support@K9P4Go.com
©2023 Copyright. All rights reserved. Violators will be prosecuted